Wood Stoves – Heating with Local Fuel

Fuel for the Wood StoveThere’s lots of buzz these days about ‘locavores’, and some people have begun to think about ‘food miles’.  But what about ‘heat miles’? Where does your heating fuel come from.  Our primary source of heat is natural gas, and while I have no idea where that is sourced from, I’d seriously doubt it comes from anywhere nearby.  But the fuel for our supplemental heat does.  About 2 years ago we got a Jotul wood stove that sits on our hearth. That little stove (the Nordic QT) really cranks out the heat. This year it will be burning local wood.

A friend recently offered up some seasoned oak from his property. (Thanks, Bill!) I thought, great – but I’d better get the wood I already have cut, split and stacked, before I go get more wood.  We don’t have very much storage around here for extra piles of wood.  The wood that was already piled in the driveway was from 2 places, both on our block.  Our next-door neighbor had ‘pruned’ his mature jacaranda tree last year and I salvaged as much as I could handle from that. We still had quite a bit piled up, seasoning. And then this year another neighbor across the street cut down a tree and offered some of the wood to us.

All that wood had been sitting there, waiting to be cut to size to fit in our little wood stove. The Jotul F-100 can accommodate wood up to 16 inches long, and I usually cut it a bit shorter than that.  I don’t want to remove a smoldering log that didn’t quite fit in, carry it across the living room and out the front door.  Better safe than sorry.

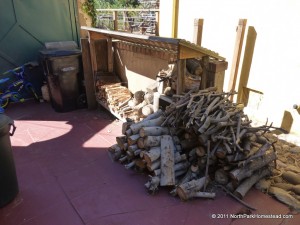
Wood stove fuel stackedAlthough there’s something really appealing to me about the idea of splitting wood by swinging a big wedge, I’m pretty sure I would never do it often enough to get good at it. I’m more interested in chopping wood than my leg, so instead I use a smart splitter.  You can see it in this photo just to the left of the wood crib. It’s safe. I get my workout, and it gets the job done.  First, I use my alligator loppers to cut the wood to length, then I split it if it seems too big or too wet. I think it seasons faster and ignites better in smaller pieces.

Fuel for the Wood StoveIt’s deeply satisfying to walk past the wood pile now – so tidy and ready to go.  Of course, recently we’ve had a Santa Ana blowing through with temps in the 80’s.  The fires will have to wait. Crunchy Chicken recently kicked off the Freeze Yer Buns Challenge 2011, so I guess I’m not the only one getting ready for the colder months. What are your plans for staying warm this winter?

Posted in Woodheat | Tagged | 2 Comments

Building an Urban Chicken Coop

Urban Chicken Coop

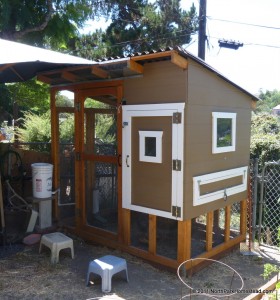
Earlier this year I posted some pictures of the coop build. I didn’t really include much information about the process. Now that life with chickens has settled out of its newness, it seemed time to go back and fill in the gaps, and bring in a little more detail on how I planned and built the coop. I added a permanent set of pages on the site. You can get to them from the links below or from the ‘Urban Coop’ menu.

I’ve filled in details in these areas:

  1. Research and Design
  2. Site Prep and Foundation
  3. Framing the Coop
  4. Roofing and Siding
  5. Doors, Windows and Ventilation
  6. Enclosing the Run
  7. Finishing Touches

If there are some areas that you think I’ve missed or skimped on, please let me know. I’m really interested in your comments and feedback.

Posted in Chickens | Tagged , | Leave a comment

First Homestead Egg

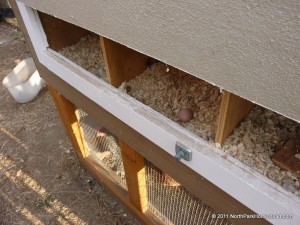
First Homestead EggWhen we got our chickens back in the middle of May, they were about 2 weeks old. Much of what I’ve read said that they start to lay around 20 weeks.  Seems to be pretty close – I think they’re 21-22 weeks old now and we just got our first egg.

I went out to say hi to the chickens yesterday after work. I’d been looking once or twice a day – since it seemed imminent based on their age and the redness of their combs and wattles.  I openened up the coop to refresh their water and noticed that the shavings in the nest boxes looked quite different.  Instead of being flat and level, they were strewn about and nestled down into a little bowl shape… and there in the box I saw our first egg!

Homestead Chicken Egg
I’m not sure which one is responsible… but we’re happy the eggs have started.  With 2 barred rocks (4 per week) and a rhode island red and black star (5 per week), we expect to get 18 eggs per week. Probably more than we can use, but I’m sure we’ll find friends and neighbors willing to take care of any overflow.  Anybody?

homestead egg was small


The first one was very tiny. Thought maybe it was a fart egg(scroll down to post #15 for a hilarious little story), but no – it did have a yolk.  We cracked it open today. We shared the tiny scrambled egg and it was really good. Very different from store bought.


Since we stored this egg overnight, we put it in an egg container – I said “Put it in point-end down.” And, of course, the next question was “why?” Well, because… that’s what I was taught. But the question lingered and here’s what I found:

Do you have chickens? How long did it take them to get into the full swing of things? We’re anxiously awaiting the next ones.

Posted in Chickens | Tagged , | Leave a comment

Criolla Sella Infused Oil

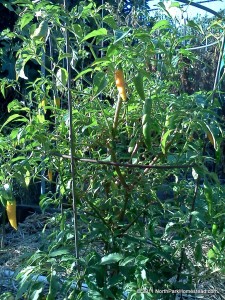
Criolla Sella Chile Pepper PlantHere in San Diego, pepper plants are perennial and this Bolivian Criolla Sella plant has been growing for 2 years.  It continues to crank out the peppers. We have already dried and crushed enough peppers to last us a year and have another bag of dried peppers ready to be used somehow…

I got these seeds as a gift packet from Seeds of Change, but apparently, they’ve discontinued sales of this particular variety. I just did a quick search and they are still available through a few heirloom seed vendors. (Not very common, though – it’s been a while since something I googled had fewer than 25K hits.)

Criolla Sella seed packetAt 70,000 Scoville heat units (I’ve seen estimated SHU from 30K to 100K), this Bolivian chile is not one that I want to munch like candy, but a friend did and pronounced them ‘tasty – a little sweet, kinda fruity’. One review said that the flavor is ‘distinctly pineapple’.  Don’t know about that, but I do really like the heat.  I call it a clean burn.  They don’t fry your lips and tongue, but give you some heat in the chest.  You can still taste the food you’re eating and enjoy the complimentary heat.

Given the abundance of the plant, we have to share the wealth.  I’ve taken some into work and had the favor returned with some delicious salsa in the office kitchen.  We gave some to a neighbor and got back some outstanding infused oil. We used that oil in everything – well, maybe not everything… but it added so much to dishes from scrambled eggs (not ours yet) to pasta. Very nice kick.  So I went and asked for the recipe.  It may take a little experimentation or a demonstration to get the details right – he said he’s not even really sure how he makes it – it just happens.  But, to the best of his recollection, here’s how it goes (Thanks, Alan!):

Heat some EVOO – really hot
Turn off the heat and start adding the goodies:
Add the chopped fresh peppers – wait 5 minutes
Add some ground black pepper – wait 5 minutes
Add some salt
If you’re going to add garlic, add it a little later and go easy because it can overwhelm the rest of the flavors
Let it all cool
After it’s cooled down, strain it and put it in a jar to store it.

Use liberally and happily. What’s your favorite way to use hot peppers?

Posted in Permaculture, Recipes | Tagged , , | 3 Comments

Gravity fed drip irrigation – is it worth it?

“If you buy what you don’t need, you steal from yourself.”  -Swedish proverb

Gravity Fed Drip Irrigation InstalledI’m a frugal person of Swedish descent, so why did I feel compelled to spend the time and money buying and installing a drip system for the back 40?  I have a perfectly good hose I could use to move the water from the rain barrels to the plants…

The main reasons are laziness and efficiency.  I don’t want to waste water or time.  I have so little ‘free’ time on the weekends – I don’t want to spend much of it moving a hose from one plant to another and waiting as each one has its turn.  I had made a pvc ‘sprinkler’, which worked well enough for the bananas, but it sprayed out lots of water pretty fast and unevenly.  There was no way to control the watering, and it did not work well for the raspberries.

Benefits of Drip Systems

There are lots of benefits to using drip systems – they’re very efficient in delivering water to a specific plant’s roots, with less runoff and leeching, less evaporation while watering, less weed growth, and the plant’s leaves stay dry. They save time after the initial installation… The list goes on and on.

Using Captured Rainwater for Drip Irrigation

But – there are a couple problems with hooking up rain barrels to a drip system.  First, the water is not clean.  That’s fine for the plants, but not so fine for the drip emitters which can clog easily. Most drip emitters are also rated for a higher water pressure than gravity provides.  Even if you have enough pressure (you get 0.43 psi per foot of drop) to push the water through some emitters, they don’t provide an easy way to balance the system and really put the water where you want it.

I looked around a bit and found what I hope will be the ideal system.  It has an inline filter which will help keep the sediment out of the line. But it doesn’t depend on that alone.  The emitters are actually valves the can be opened fully to flush them out, and then dialed down to just a drip or trickle for each plant.  Using valves for emitters also lets you balance the system so the bananas (very thirsty) can have more water than the raspberries. Nice.

I bought my system from Drip Depot. They offer Standard (20 emitters), Deluxe (30 emitters) and Premium (50 emitters) gravity fed drip irrigation kits for dirty water. The kit did have some parts I didn’t need, but it was pretty easy to build my own kit based on the parts list. They also have a nice collection of videos so you can see how to assemble everything and how all the parts work.

Gravity Fed Drip Irrigation KitThey shipped quickly and all the parts were well packaged. They even included a couple of Tootsie Pops with their thank you card.  Kenny liked that idea – a lot. I installed it in about an hour, including cutting/positioning all the lines and staking in all the valve drippers. Then I turned it on and thought it would take quite a while to get it all balanced.  Happily, that only took about 10 minutes.

Gravity Fed Drip Emitter ValveNext up – measure the level drop in the rain barrel for an hour of drip, approximate how much water is going to the plants and plan the watering schedule.  One nice part about running the system from the barrels is that even after the rainwater is long gone, you can fill the barrel with the right amount of water (from the hose) and then just let it run.  I don’t even have to remember to turn it off.  Great for lazy folks.

Posted in Permaculture, Rainwater | Tagged , , , | Leave a comment